CompoundButton
2023. 8. 9. 12:48ㆍAndroid Studio
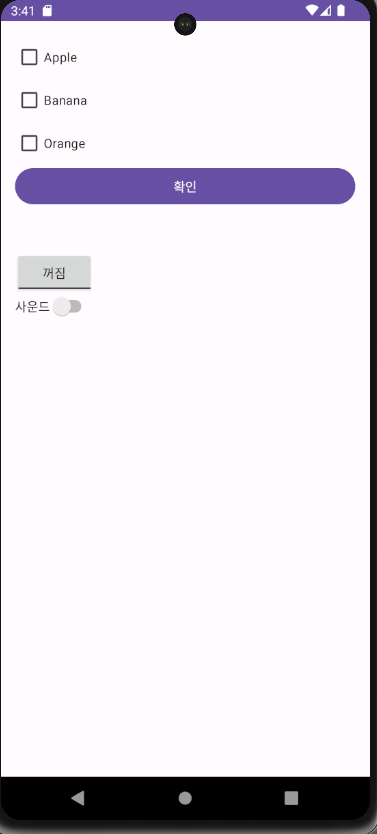
체크박스에 체크하면 버튼 아래에 글자가 붙어서 출력되는 기능을 가진 어플을 만들어 볼것이다

<?xml version="1.0" encoding="utf-8"?>
<LinearLayout xmlns:android="http://schemas.android.com/apk/res/android"
    xmlns:app="http://schemas.android.com/apk/res-auto"
    xmlns:tools="http://schemas.android.com/tools"
    android:layout_width="match_parent"
    android:layout_height="match_parent"
    android:orientation="vertical"
    android:padding="16dp"
    tools:context=".MainActivity">

    <CheckBox
        android:id="@+id/cb1"
        android:layout_width="wrap_content"
        android:layout_height="wrap_content"
        android:text="Apple"
        android:checked="true"/>
    <CheckBox
        android:id="@+id/cb2"
        android:layout_width="wrap_content"
        android:layout_height="wrap_content"
        android:text="Banana"/>
    <CheckBox
        android:id="@+id/cb3"
        android:layout_width="wrap_content"
        android:layout_height="wrap_content"
        android:text="Orange"/>
    <Button
        android:id="@+id/btn"
        android:layout_width="match_parent"
        android:layout_height="wrap_content"
        android:text="확인"/>
    <TextView
        android:id="@+id/tv"
        android:layout_width="wrap_content"
        android:layout_height="wrap_content"
        android:text="RESULT"
        android:textColor="@color/black"
        android:textSize="24sp"
        android:textStyle="bold"
        android:padding="8dp"/>

    <ToggleButton
        android:layout_width="wrap_content"
        android:layout_height="wrap_content"
        android:textOff="꺼짐"
        android:textOn="켜짐"/>

    <Switch
        android:id="@+id/sw"
        android:layout_width="wrap_content"
        android:layout_height="wrap_content"
        android:text="사운드"/>

</LinearLayout>
package com.tsj2023.ex05compoundbutton;
import androidx.appcompat.app.AppCompatActivity;
import android.os.Bundle;
import android.view.View;
import android.widget.Button;
import android.widget.CheckBox;
import android.widget.CompoundButton;
import android.widget.Switch;
import android.widget.TextView;
public class MainActivity extends AppCompatActivity {
//뷰들의 참조변수
CheckBox cb1, cb2, cb3;
Button btn;
TextView tv;
Switch sw;
@Override
protected void onCreate(Bundle savedInstanceState) {
super.onCreate(savedInstanceState);
setContentView(R.layout.activity_main);
// xml의 뷰들을 찾아와서 참조변수에 대입
cb1=findViewById(R.id.cb1);
cb2=findViewById(R.id.cb2);
cb3=findViewById(R.id.cb3);
btn=findViewById(R.id.btn);
tv=findViewById(R.id.tv);
sw=findViewById(R.id.sw);
sw.setOnCheckedChangeListener(new CompoundButton.OnCheckedChangeListener() {
@Override
public void onCheckedChanged(CompoundButton compoundButton, boolean b) {
//두번째 파라미터 b - 감시하는 Switch객체의 체크상태값을 가지고 있는 매개변수
tv.setText(b+"");
}
});
// 체크박스의 체크상태가 변경돨때 마다 반응하는 리스너 객체를 생성 및 설정
CompoundButton.OnCheckedChangeListener listener=new CompoundButton.OnCheckedChangeListener() {
@Override
public void onCheckedChanged(CompoundButton compoundButton, boolean b) {
String s="";
if (cb1.isChecked()) s += cb1.getText().toString();
if (cb2.isChecked()) s += cb2.getText().toString();
if (cb3.isChecked()) s += cb3.getText().toString();
tv.setText(s);
}
};
cb1.setOnCheckedChangeListener(listener);
cb2.setOnCheckedChangeListener(listener);
cb3.setOnCheckedChangeListener(listener);
//버튼이 클릭되었을때 반응하는 리스너 객체를 생성 및 설정
btn.setOnClickListener(new View.OnClickListener() {
@Override
public void onClick(View view) {
//선택되어 있는 CheckBox의 글씨를 얻어오기
String s="";
if (cb1.isChecked()) s += cb1.getText().toString();
if (cb2.isChecked()) s += cb2.getText().toString();
if (cb3.isChecked()) s += cb3.getText().toString();
tv.setText(s);
}
});
}
}그외에 스위치를 사용하여 사운드가 on 되면 true가 출력되게 해보았다

'Android Studio' 카테고리의 다른 글
| ImageView (0) | 2023.08.09 |
|---|---|
| Widget 만들기 (0) | 2023.08.09 |
| TextView의 속성들 (0) | 2023.08.01 |
| 안드로이드 스튜디오로 자바 GUI랑 똑같이 작업해보기 (0) | 2023.07.26 |
| 안드로이드 스튜디오 첫 수업 (0) | 2023.07.26 |